Showing newest 12 of 13 posts from February 2011. Show older posts
New Endeavors: New Blog Format- Here We Go!
Featured Artist: Jacob Lawrence
Artists at Play: Bead Table Wednesday
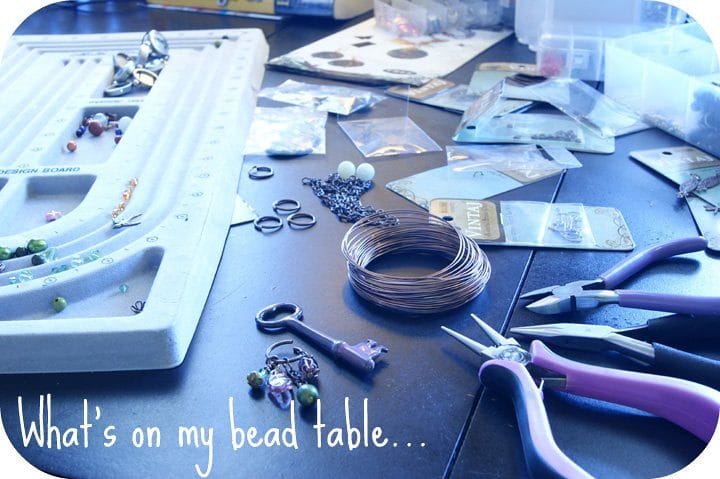
I’ve joined the Bead Table Wednesday Flickr Group, and will be welcoming you to my studio at least once a month to update you on my most recent jewelry endeavors!
Currently, I find myself obsessed with all things Vintaj! I’m late to the beading party, so I have just discovered this wonderful company that offers brass components and embellishments for your custom jewelry. Here’s the best part, most are designed to be altered! Look out, because I am about to go crazy with stamps, inks, hammers, punches and this amazing product called “Magic-Glos.”
I am on a quest to unite my love of painting, jewelry and fibers. This is going to look different as I move from one emphasis to the other, but I am really drawn to mixed media art. I have created jewelry for years, but I find myself revisiting simple linking, looping and wrapping techniques. Proficiency at basic technique is always essential, so I’m sharing these easy tutorials I practiced this week!

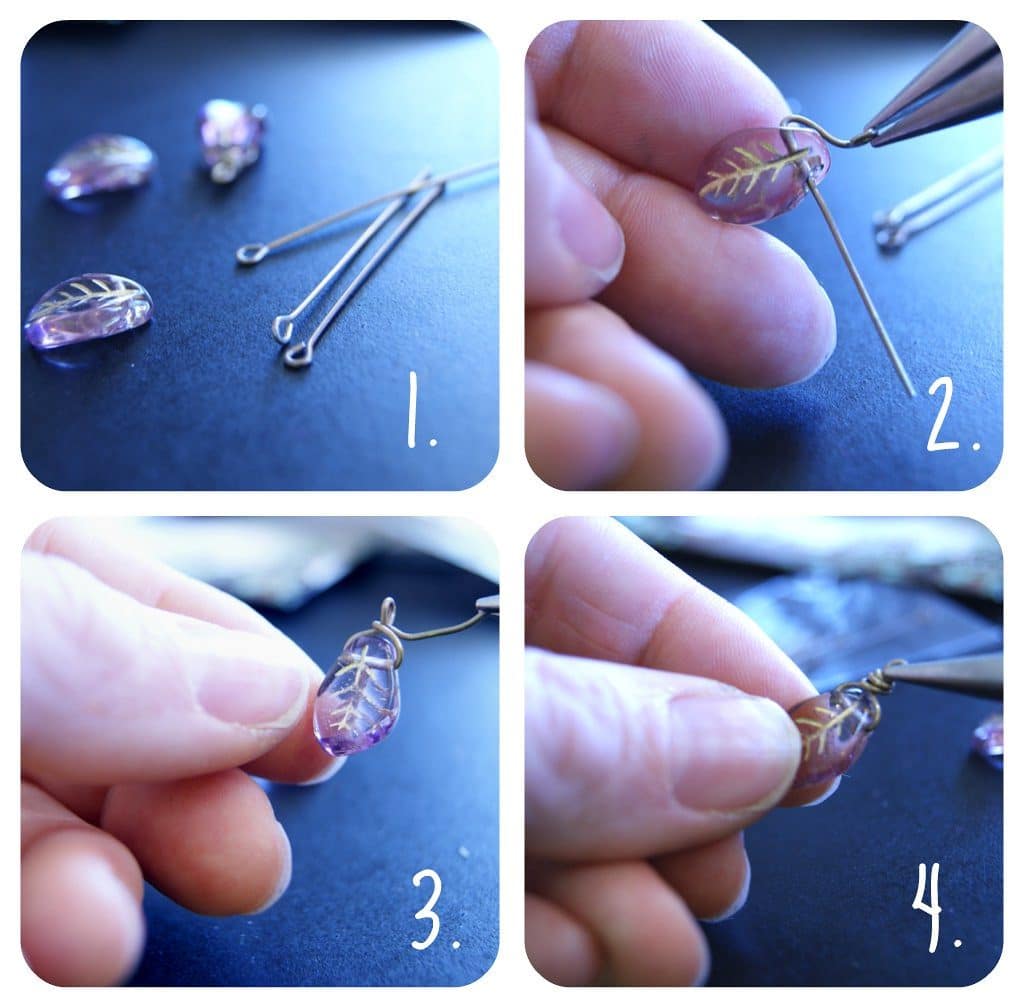
2. String the bead onto the eye pin. Bend the looped end of the eye pin back over the top of the bead, leaving about 1/8 inch between the loop and the top of the bead.
3. Bend the long, straight end of the eye pin so that it crosses in front of the neck of the looped end at the top of the bead, then wrap it behind.
4. Using chain nose pliers, continue wrapping the tail end tightly up the neck of the eye pin to create coils. Trim any excess wire with the side cutters, and tuck the end of the wire into the coils.

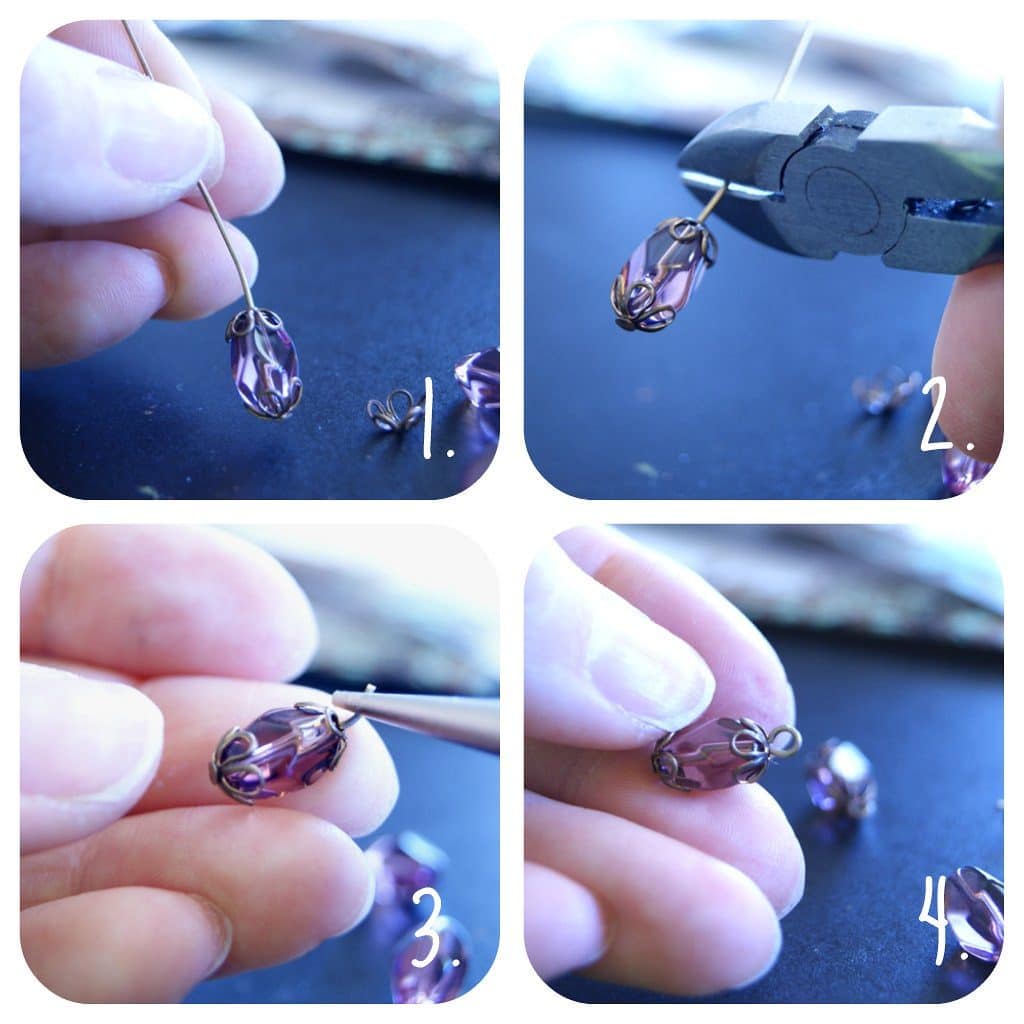
You will need: head pins, bead caps, beads, round nose pliers, side cutter pliers
1. String the bead cap and the bead onto the end of the head pin.
2. Using the side cutter pliers, cut the head pin approx. 1/4 inch above the bead.
3. Use the round nose pliers ro grip the end of the eye pin, pulling toward you at a 45 degree angle.
4. Begin turning the end of the pin away from you, using the jaw of the pliers to form a loop. Secure the end of the loop into the bead cap.
Now you have the building blocks of linking bliss. Add some jump rings to secure your newly looped creations to bigger jump rings or chain. I am working on a “Monet” inspired focal, which features that lovely purple key (in top photo) that I won from Love My Art Jewelry, and lots of dangling, linked beady-goodness!
What’s on your bead table? Join us!
Presidential Art: Celebrating Washington and Lincoln
“I hope I shall possess firmness and virtue enough to maintain what I consider the most enviable of all titles, the character of an honest man.” ~George Washington
President’s Day is the day we celebrate two of America’s most beloved Presidents, Washington and Lincoln, so I want to share a few Art History findings about pieces they inspired!
 .
.
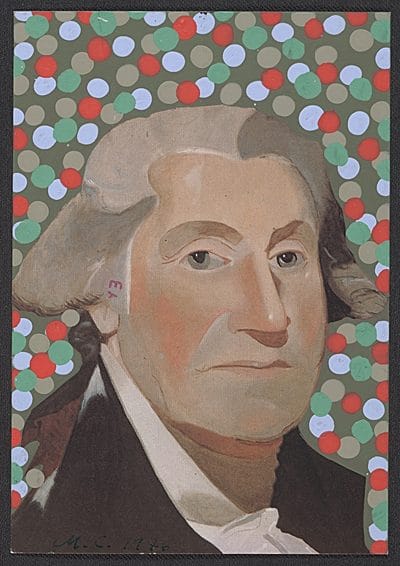
Washington was the obvious and popular choice for America’s first President, having served valiantly as the First Commander-in-Chief of the Continental Army. He was an admirably brave, yet humble and faithful man, and highly regarded by his contemporaries. At his death, Washington was hailed as “first in war, first in peace, and first in the hearts of his countrymen.”
This portrait of George Washington, is from the Smithsonian’s Jacob Kainen papers. It is a holiday card sent to Jacob Kainen in 1977 by Michael Clark, who embellished a postcard print of his Washington portrait with large painted dots. It was difficult searching for more contemporary homages to Washington and Lincoln. I found this via Archives of American Art, which is a phenomenal resource.
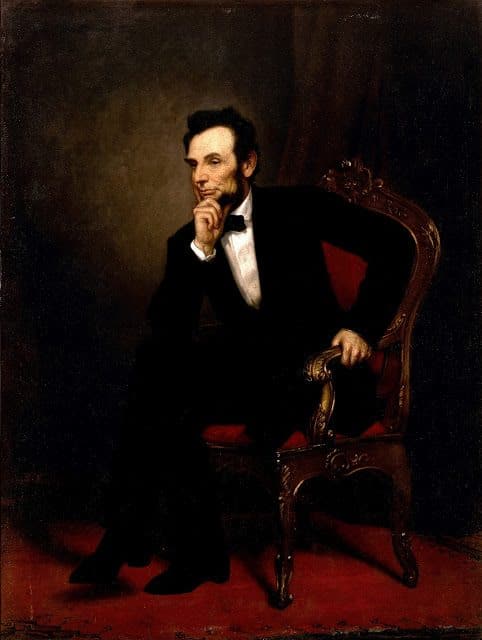 America’s 16th President, Abraham Lincoln is still beloved by our nation for leading our country through one of it’s most divisive periods in history. “In temper he was earnest, yet controlled, frank, yet sufficiently guarded, patient, yet energetic, forgiving, yet just to himself; generous yet firm,” wrote J. T. Duryea of the U.S. Christian Commission, which met frequently with President Abraham Lincoln. “His conscience was the strongest element of his nature. His affections were tender and warm. His whole nature was simple and sincere – he was pure, and then was himself.”
This is the Official White House portrait of Lincoln, painted in 1869 by George Healy. The artist has portrayed “Honest Abe” in a pose of intent listening. The portrait was painted in Paris and sent to Washington in response to an act of Congress (March 3, 1869) authorizing a Lincoln portrait for the White House. It hangs in the State Dining Room of the White House.
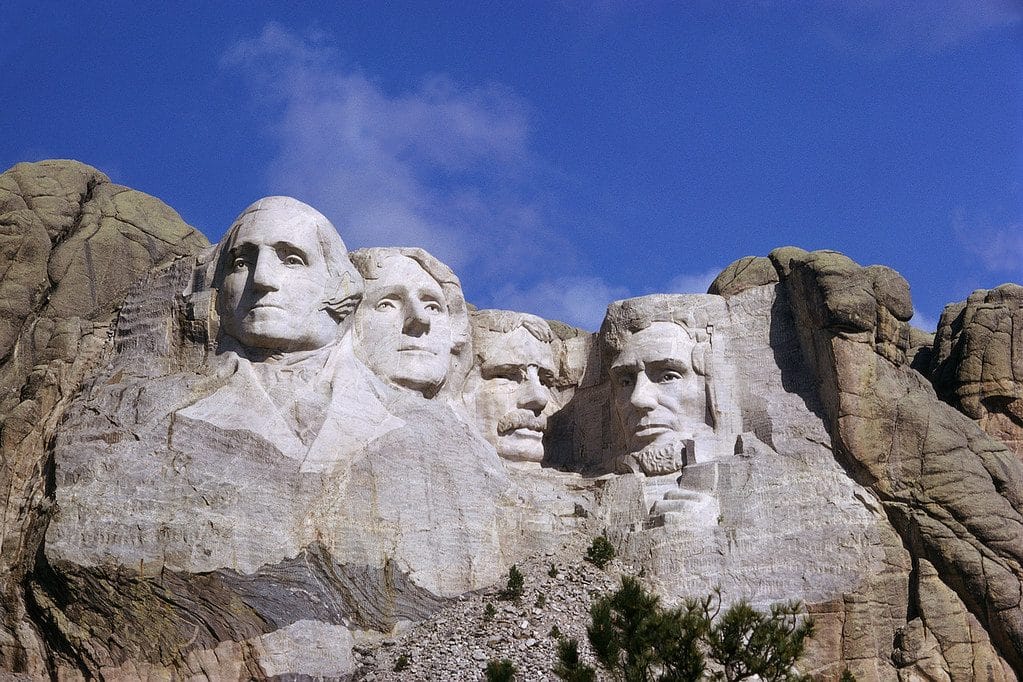 |
Between October of 1927-1942 Gutzon Borglum and 400 workers sculpted the enormous 60 foot likenesses of four of America’s most esteemed Presidents, Washington, Jefferson, Roosevelt and Lincoln, into the Black Hills region of South Dakota. The site for the monument was “Mount Rushmore,” the tallest mountain in the region, composed of durable, fine-grained granite, which only erodes 1 inch every 10,000 years.
It was originally planned for each President to be rendered from head to waist, but lack of funding forced construction to end in October 1941- sometimes the best designs really do happen by accident! I think the simplicity of the busts retain the natural beauty of the site itself. On October 15, 1966, Mount Rushmore was listed on the National Register of Historic Places, and is South Dakota’s top tourist attraction today.
Today we celebrate how much our country has accomplished since its inception, and are thankful for the courageous leaders who have served America in times of success and turmoil. To live in a country where our government is freely elected by the people is a freedom we are truly blessed to have!
Art Tour: International Snow Sculpture Championships
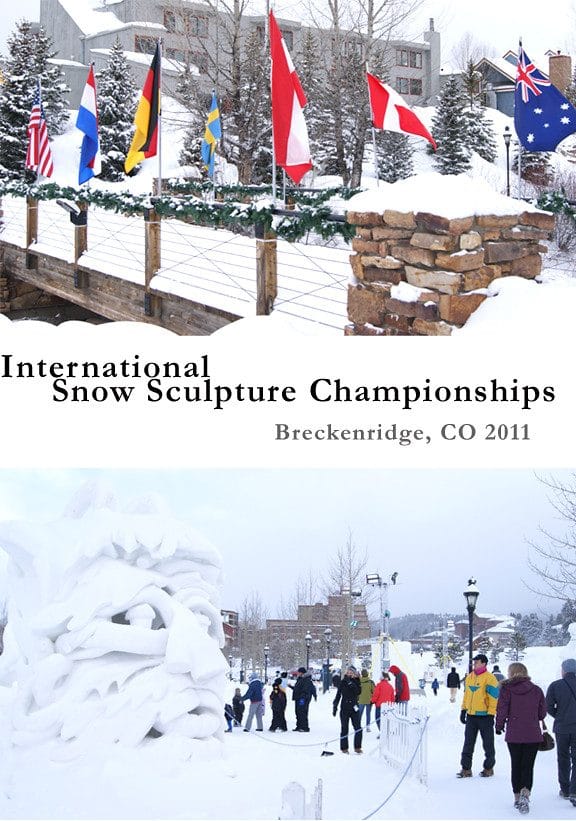
The teams were each comprised of four members who were challenged with the task of carving their own 20-ton, 12-foot-tall block of snow (image 1). Power tools, internal supports and colorants were forbidden, so sculptors had to rely on hand tools (imagine sandbox toys and kitchen utensils!) to shape their snow.
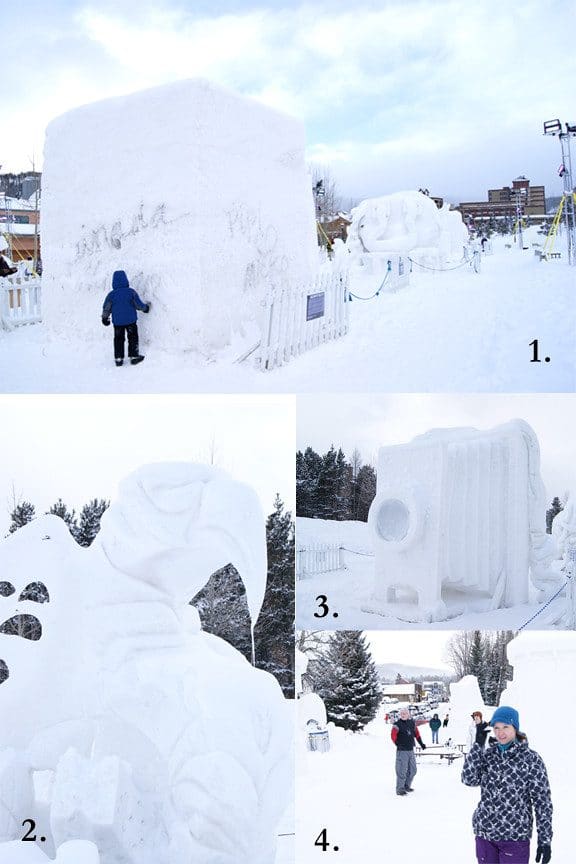
This year’s first place winner was “Alebrije” by Team Mexico (image 2). By the time we got to him, the beak had melted, dripped, and re-froze, but I find that fascinating! Watching the art interact with the environment, and letting Mother Nature have a go at it, is an intriguing part of this event.
One of my favorite sculptures was this 1900s style camera (image 3). The lens was a solid piece of ice that was translucent, in contrast to the snow. Though it was blocked by a fence, you felt like you could step under the hood, and snap a few snowscapes!
This event is not for the faint-of-heart, the unpredictable weather in the Rocky Mountains can very quickly divert your plans! It was a blizzard all day while we were snowboarding, and then the clouds parted just in time for me to walk through the exhibit and snap some shots (image 4).
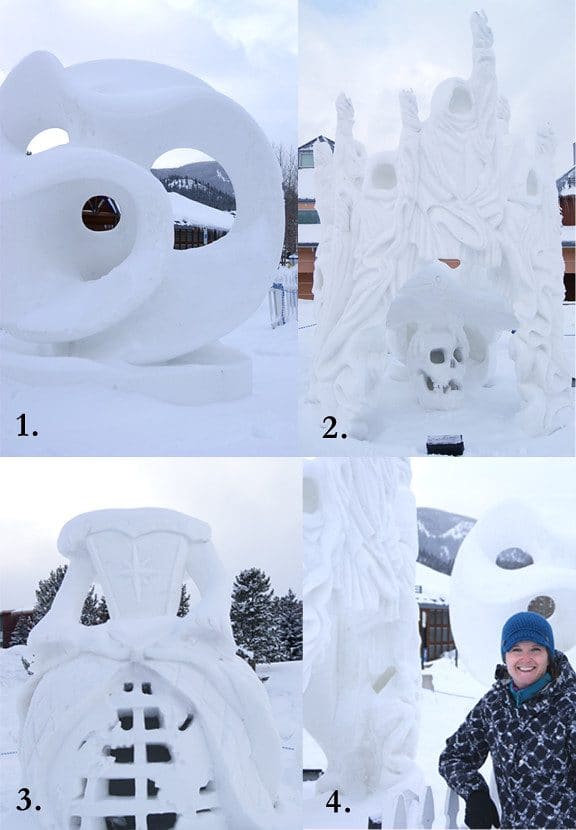 I love the abstract, so I was immediately drawn to Sweden’s entry, “Perpetual Motion,” which reminded me of Henry Moore’s “Locking Piece” sculpture (image 1). Team Yukon received second place for their haunting sculpture, “Spirits of the Aurora,” which portrays the Northern Lights as torches held by spirits seeking the souls of those who just died (image 2). “Mere De Nation” was Team Canada’s entry, which paid homage to the adventuresome young brides who crossed the Atlantic in the 1600’s to marry the settlers of the Saint Lawrence River Valley. The sculptures were illuminated at night and you can visit the website to see more beautiful photos of the winning snow sculptures. It was impressive to see these large pieces. My husband and I always joke about needing a “scale figure” in a photo- so here I am! (image 4)
The entire competition lasts three weeks. The first week you can see the blocks of snow being built, the second week allows you to watch the sculptors work, and the third week is for viewing the sculptures before they are taken down. This was my first year to view the snow sculptures, but I look forward to visiting again next year!
Style Trend: Statement Necklaces- Are they here to stay?
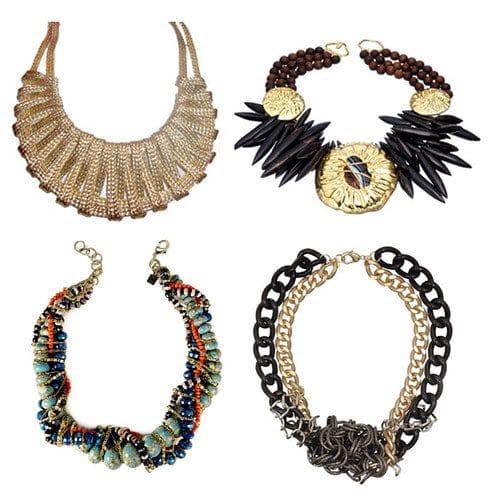
Clockwise, from top left: “Gold-Plated ‘Wonder” by What’s-in-Store, “Tilda” by Alexis Bittar,
“Mixed Metal Knot” by Hive & Honey, “Aalia” by Dannijo
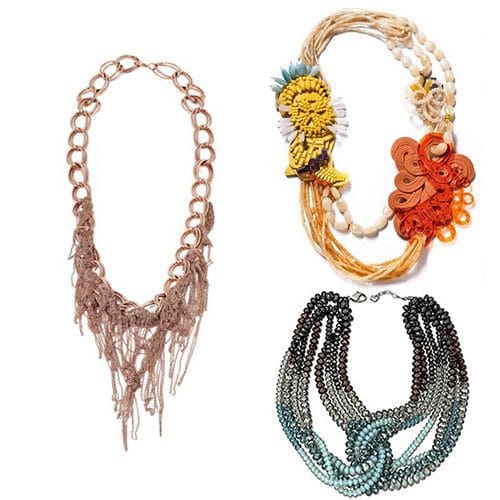
Left, “Isabella” by Dannijo, Top right, Design by Denise Julia Reytan via Designing Mazorie,
Bottom left, “Looped Multi-Strand” via Eclectic Jewelry and Fashion
“Statement Necklaces” are huge (literally- the bigger, the better!).
They’ve been a big trend for several years now, and I have to ask-
“Are they here to stay?” Personally, I think the answer is “Yes!“
Why are we so obsessed with these big chunky pieces?
Two answers immediately come to my mind:
One: They express our unique fashion sense, and empower us to unapologetically flaunt it! There are a million design possibilities with statement necklaces: color, texture, material, length and drape. We can dramatically display our appreciation for the avant-garde, not to mention having a guaranteed topic of conversation!
Two: They are surprisingly easy to wear! Dress them up with an elegant gown, or go casual with faded jeans and a tee: both combos work with a statement necklace! Nothing is better than looking completely put together by simply pulling in one accessory. Don’t believe me? Check these out:

Image sources: Fashion Style Advice, Empowered Traditionalist, Fashion Without Borders
“Statement Necklaces” spark my imagination and get my creative juices flowing! Their construction is fascinating, and their possibilities are endless. Plus, put one on and they’re just fun! For my own jewelry, I’m using these examples as beginning references to explore design and materials.
I’d love to hear your thoughts on the statement necklace!
Do you have any in your wardrobe? Why or why not?
I ♥ Art! World Famous Art to Inspire your Valentine’s Day
Artists at Play: Valentine’s Painted Canvas Tags
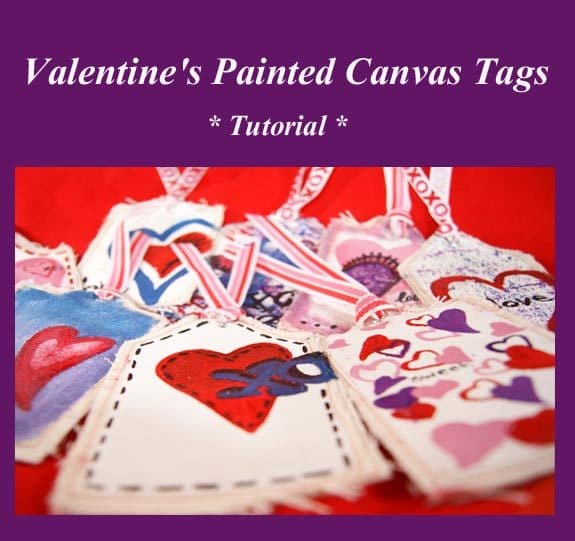 Here’s a simple craft, that has lots of different applications, especially if you are a painter! If you’re not a painter, just break out some colors and have fun with it! These are unique gift tags, but would also be fun on cards and in scrapbooks. For you crafty entrepreneurs, these would make a special addition to your packaging! Like ACEO’s? This technique can be used to create some new editions! Most importantly, they are a great excuse to get whimsical and doodle with paint!
Materials:
fabric (any sturdy cotton or polyester fabric will do!)
paints (I used oil paint for fun, but acrylic or craft paint is fine!)
brushes
pencil (or disappearing fabric pen)
eyelets (3/16″ in size)
ribbon (narrow enough to fit through eyelet)
thread
sewing machine
scissors
hole punch
Crop-A-Dile (or eyelet setting tool)
card stock tag template
Gesso, or solid acrylic paint of choice for base coat
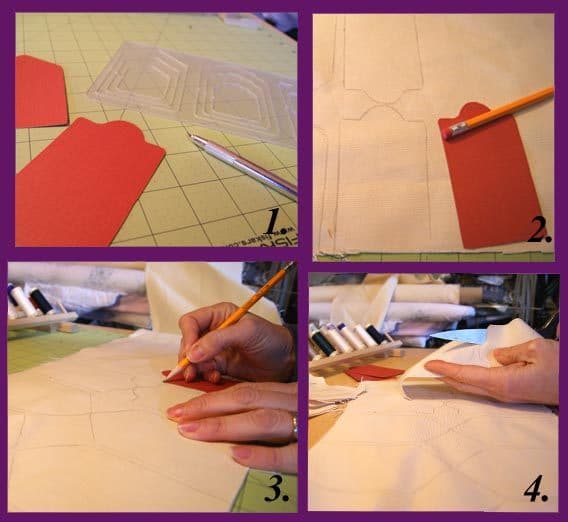
1. Make a card stock tag template. I created mine using a Coluzzle template, but any simple tag shape will do. Avoid curves and scallops, as those extra details are more complicated to sew.
2. Using your template, trace tags onto your fabric. I simply used a pencil and then sewed the pencil sides together. You could use a disappearing fabric pen if you are concerned with visible marks.
3. For stability, it’s best to make the tags double-sided, so trace two tags for every one you wish to complete.
4. Using sharp scissors, cut out the tags. Pin two like sides together. The edges will fray, but this will be limited by the stitching when you sew them together.
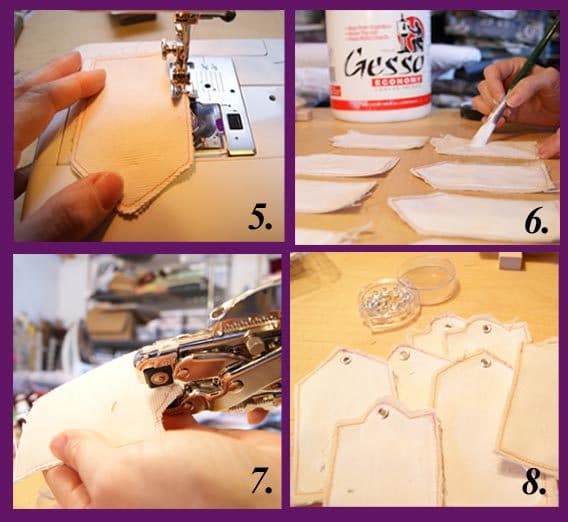
5. Using a simple straight stitch, and the thread color of your choice, sew the two sides of each tag together. Again, the edges will fray. Personally, I love this look. If you prefer clean lines, use Fray Check, or a more complex sewing technique will be necessary. 6. Coat one side of each tag with Gesso, or plain acrylic paint. I stayed inside the stitch lines, because I like to keep those visible, but go with whatever works for your design.
7. Using the Crop-A-Dile (which is a fabulous tool-I love it!), punch a hole at the top of each tag, and set an eyelet in the hole. Here’s a video using the Crop-A-Dile, and here’s a more traditional tutorial.
8. Now your tags are ready to paint! I like leaving one side plain, on which you can write or stamp a greeting. I didn’t show the process of painting, because…. just have fun! Start with hearts, bright stripes or flowers, or just paint a great word in fun colors.
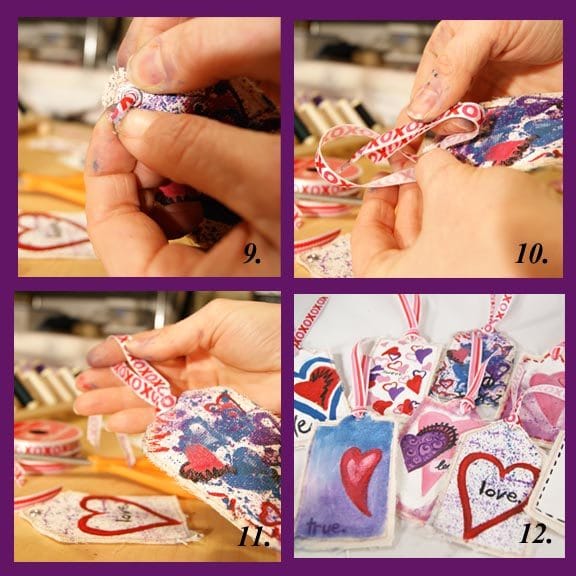
9. Once your tags are painted and dry, snip a good 12 inches or so of your ribbon and embellish your tag. Fold the length of ribbon in half, and push the two loose ends from the back, through the eyelet, to the front of the tag.
10. There will be a loop on the back side of the tag. Bring this over the top of the tag and feed the two loose ends of ribbon through the loop.
11. Pull all the way through. If your ribbon is a snug fit, pull carefully so you don’t pull out the eyelet!
12. My completed set of tags! This was my first attempt at this project, but I have to say it was fun!
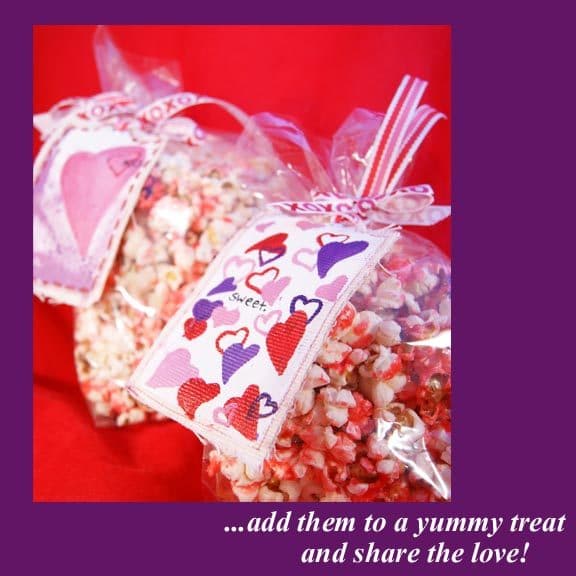
* I attached my tags to bags of homemade cinnamon popcorn (so delicious!) Have you ever tried to make your own popcorn? It’s fun! Here’s the Red-Hot Cinnamon recipe I used to make it more festive!
Enjoy!
Original Art For Your Valentine? Yes!(all under $100)
If I could pick any gift in the world for Valentine’s Day (besides a trip to Rome,Italy with my husband), it would be an original piece of art. I paint, and trust me there is no shortage of art on the wall, but it’s mostly my own. However, the pieces I have purchased by other artists continually inspire me anew. The works by these painters have me captivated, and their prices are incredibly reasonable!
Original Watercolur Fashion illustrations by SilverRidgeStudio
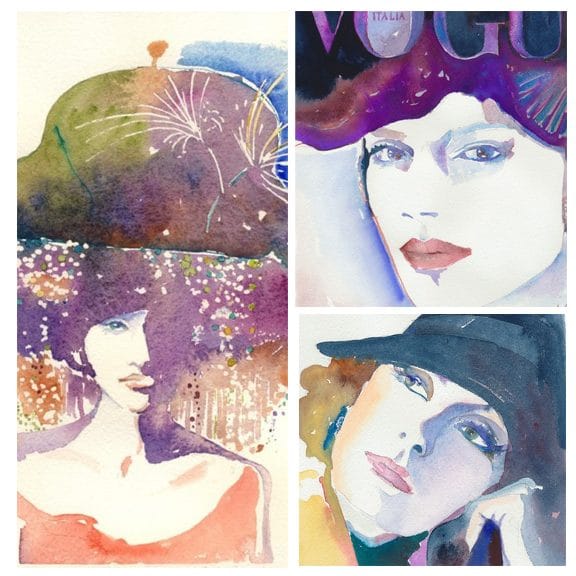 left: “John Galiano Hat” $45, top right: “Italian Vogue” $55,
bottom right: “Garbo” $65
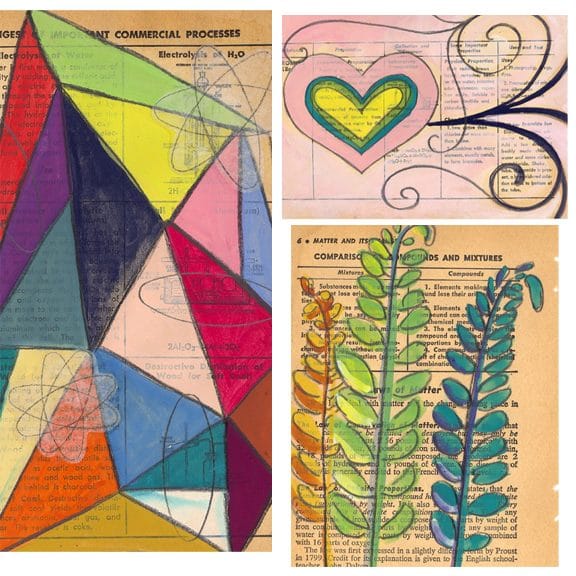
Original Paintings on Antique Book Paper by kipi

left: “Commercial Processes” $43, top right: “Warm and Fuzzy” $43,
bottom right: “Three Ferns” $43
Original Paintings by Michelle Daisy Moffitt
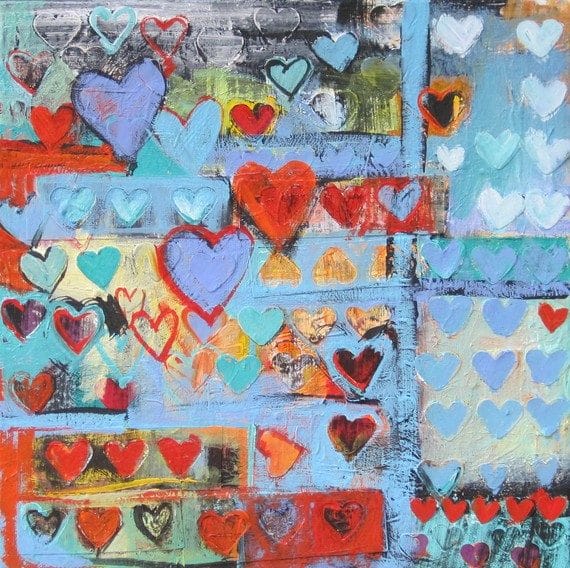 “Layered Hearts” $95
 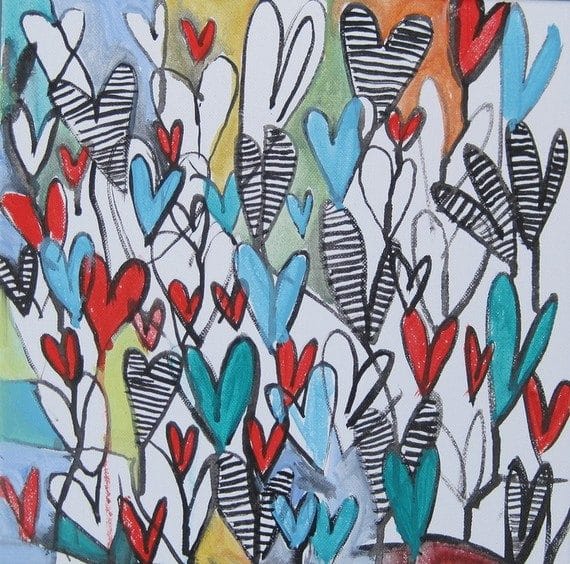 “Pop Hearts” $85
Original Oil Paintings on Clear Film by frank613
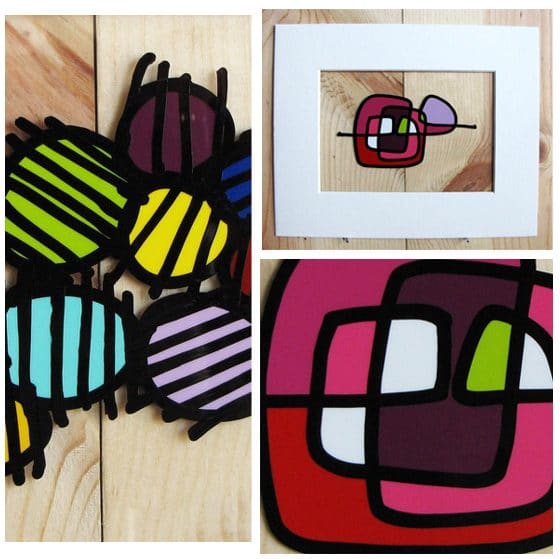 left: “Circles 022″(detail) $50, top right: “One Liner 010” $50,
bottom right: “One Liner 010″(detail)
Aren’t these pieces great? Which is your favorite? Any one of them would be a beautiful gift for a special Valentine (or yourself! hmmmm…..)
*all photographs were used with permission of the artists. Please do not re-blog without contacting them!