 Here’s a simple craft, that has lots of different applications, especially if you are a painter! If you’re not a painter, just break out some colors and have fun with it! These are unique gift tags, but would also be fun on cards and in scrapbooks. For you crafty entrepreneurs, these would make a special addition to your packaging! Like ACEO’s? This technique can be used to create some new editions! Most importantly, they are a great excuse to get whimsical and doodle with paint!
Materials:
fabric (any sturdy cotton or polyester fabric will do!)
paints (I used oil paint for fun, but acrylic or craft paint is fine!)
brushes
pencil (or disappearing fabric pen)
eyelets (3/16″ in size)
ribbon (narrow enough to fit through eyelet)
thread
sewing machine
scissors
hole punch
Crop-A-Dile (or eyelet setting tool)
card stock tag template
Gesso, or solid acrylic paint of choice for base coat
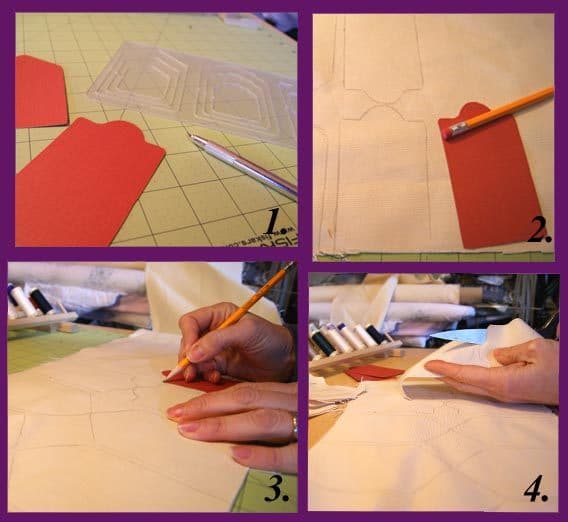
1. Make a card stock tag template. I created mine using a Coluzzle template, but any simple tag shape will do. Avoid curves and scallops, as those extra details are more complicated to sew.
2. Using your template, trace tags onto your fabric. I simply used a pencil and then sewed the pencil sides together. You could use a disappearing fabric pen if you are concerned with visible marks.
3. For stability, it’s best to make the tags double-sided, so trace two tags for every one you wish to complete.
4. Using sharp scissors, cut out the tags. Pin two like sides together. The edges will fray, but this will be limited by the stitching when you sew them together.
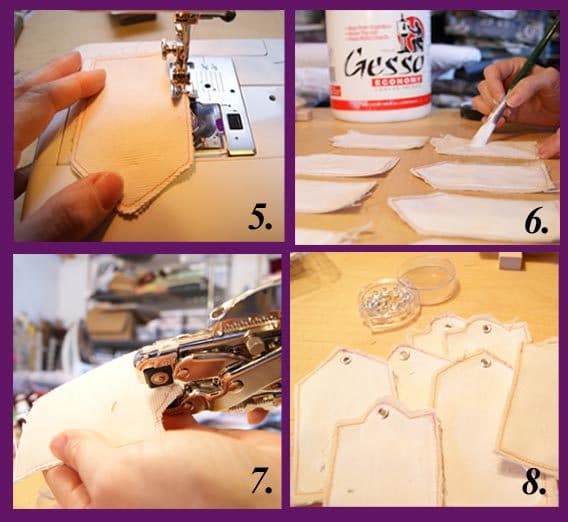
5. Using a simple straight stitch, and the thread color of your choice, sew the two sides of each tag together. Again, the edges will fray. Personally, I love this look. If you prefer clean lines, use Fray Check, or a more complex sewing technique will be necessary. 6. Coat one side of each tag with Gesso, or plain acrylic paint. I stayed inside the stitch lines, because I like to keep those visible, but go with whatever works for your design.
7. Using the Crop-A-Dile (which is a fabulous tool-I love it!), punch a hole at the top of each tag, and set an eyelet in the hole. Here’s a video using the Crop-A-Dile, and here’s a more traditional tutorial.
8. Now your tags are ready to paint! I like leaving one side plain, on which you can write or stamp a greeting. I didn’t show the process of painting, because…. just have fun! Start with hearts, bright stripes or flowers, or just paint a great word in fun colors.
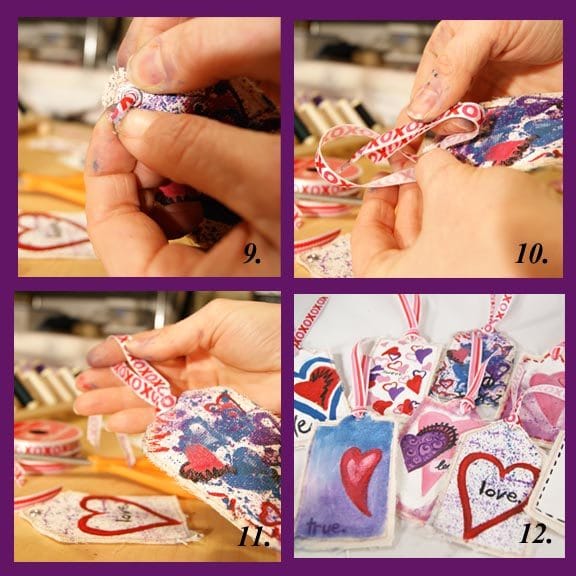
9. Once your tags are painted and dry, snip a good 12 inches or so of your ribbon and embellish your tag. Fold the length of ribbon in half, and push the two loose ends from the back, through the eyelet, to the front of the tag.
10. There will be a loop on the back side of the tag. Bring this over the top of the tag and feed the two loose ends of ribbon through the loop.
11. Pull all the way through. If your ribbon is a snug fit, pull carefully so you don’t pull out the eyelet!
12. My completed set of tags! This was my first attempt at this project, but I have to say it was fun!

* I attached my tags to bags of homemade cinnamon popcorn (so delicious!) Have you ever tried to make your own popcorn? It’s fun! Here’s the Red-Hot Cinnamon recipe I used to make it more festive!
Enjoy!