Month: February 2011

5469176703_3cbf6f870c_b-6532728

Artists at Play: Bead Table Wednesday | Elysian Studios

Artists at Play: Bead Table Wednesday

Categories: Artists at Play, Bead Table Wednesday, beads, BTW, jewelry, tutorial
5469176703_3cbf6f870c_b-6532728

I’ve joined the Bead Table Wednesday Flickr Group, and will be welcoming you to my studio at least once a month to update you on my most recent jewelry endeavors! 

Currently, I find myself obsessed with all things Vintaj!  I’m late to the beading party, so I have just discovered this wonderful company that offers brass components and embellishments for your custom jewelry.  Here’s the best part, most are designed to be altered!  Look out, because I am about to go crazy with stamps, inks, hammers, punches and this amazing product called “Magic-Glos.”

I am on a quest to unite my love of painting, jewelry and fibers.  This is going to look different as I move from one emphasis to the other, but I am really drawn to mixed media art.  I have created jewelry for years, but I find myself revisiting simple linking, looping and wrapping techniques.  Proficiency at basic technique is always essential, so I’m sharing these easy tutorials I practiced this week!

 5469199421_a0494055cb_b-9389048

5469759894_6d935be5b0_b-3614333

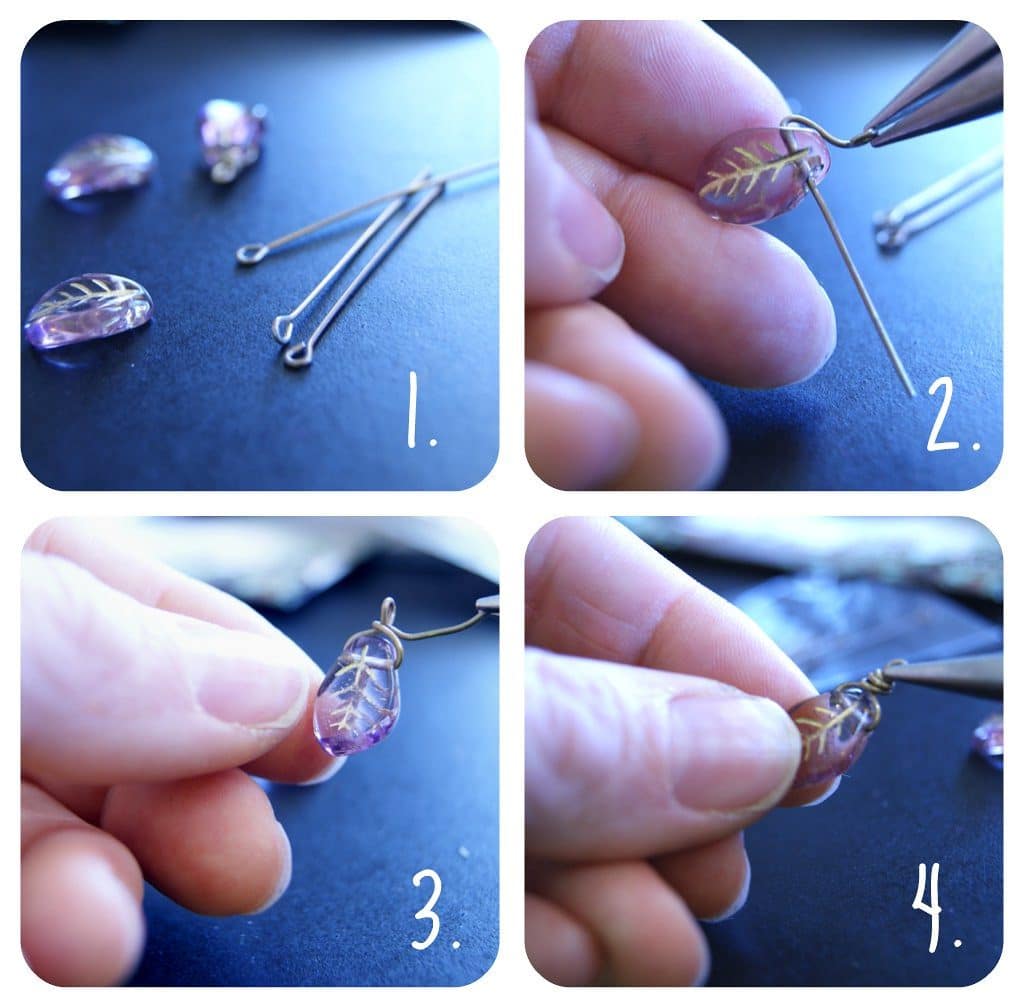
2.  String the bead onto the eye pin.  Bend the looped end of the eye pin back over the top of the bead, leaving about 1/8 inch between the loop and the top of the bead.

3.  Bend the long, straight end of the eye pin so that it crosses in front of the neck of the looped end at the top of the bead, then wrap it behind.

4.  Using chain nose pliers, continue wrapping the tail end tightly up the neck of the eye pin to create coils.  Trim any excess wire with the side cutters, and tuck the end of the wire into the coils.

5469284337_d67ff274dd_b-7802961

5469339057_d16f269a5b_b-9286354

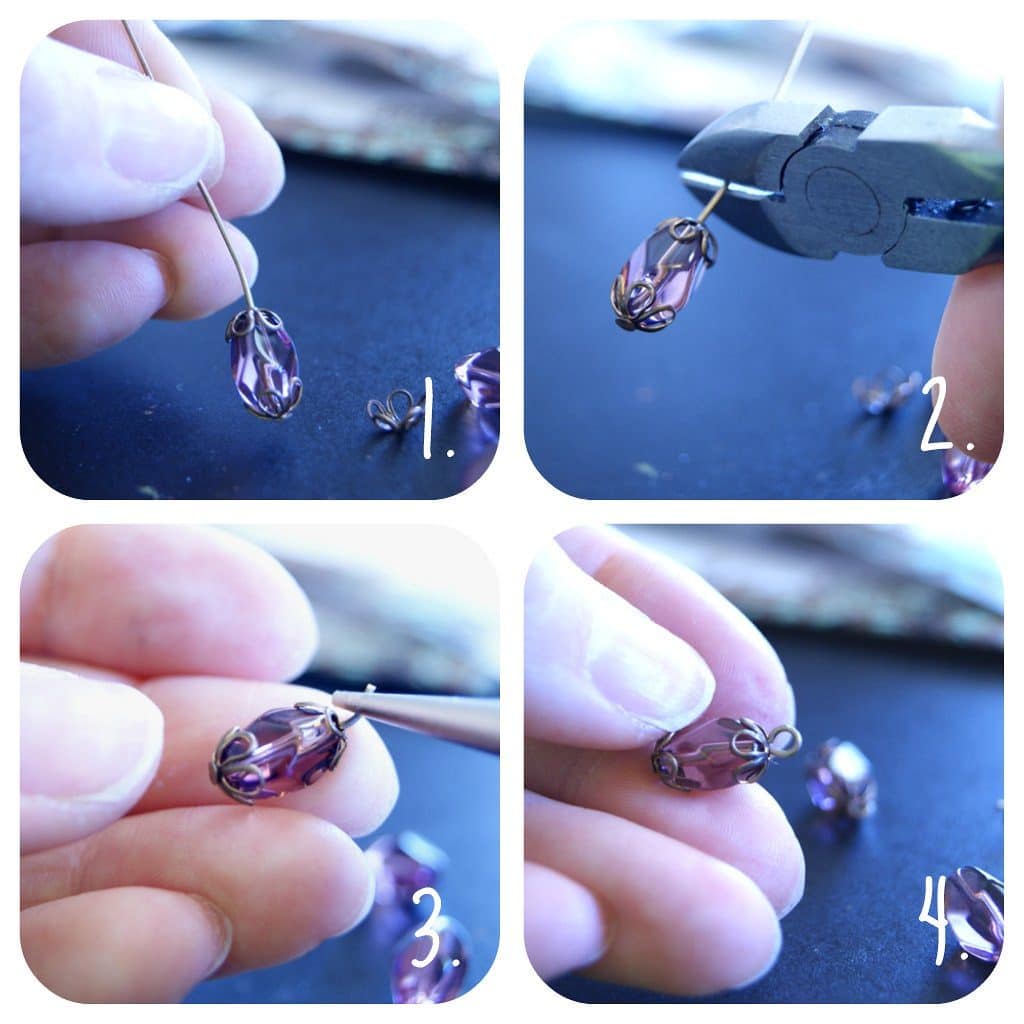
You will need:  head pins, bead caps, beads, round nose pliers, side cutter pliers

1.  String the bead cap and the bead onto the end of the head pin.

2.  Using the side cutter pliers, cut the head pin approx. 1/4 inch above the bead.

3.  Use the round nose pliers ro grip the end of the eye pin, pulling toward you at a 45 degree angle.

4.  Begin turning the end of the pin away from you, using the jaw of the pliers to form a loop.  Secure the end of the loop into the bead cap.

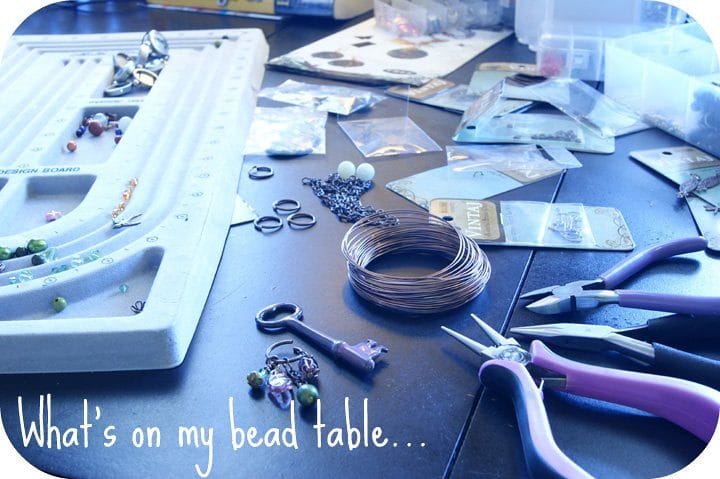
Now you have the building blocks of linking bliss. Add some jump rings to secure your newly looped creations to bigger jump rings or chain.  I am working on a “Monet” inspired focal, which features that lovely purple key (in top photo) that I won from Love My Art Jewelry, and lots of dangling, linked beady-goodness!

What’s on your bead table? Join us!
Spread The Love, Share Our Article

  • icon-mini-delicious-4203078
  • icon-mini-digg-3448305
  • icon-mini-stumbleupon-1219365
  • icon-mini-technorati-2207437
  • icon-mini-twitter-5093697
5475325076_f161128039_z-4711410

Featured Artist: Jacob Lawrence | Elysian Studios

Featured Artist: Jacob Lawrence

Categories: Art History, Featured Artist, February, painting

5475325076_f161128039_z-4711410

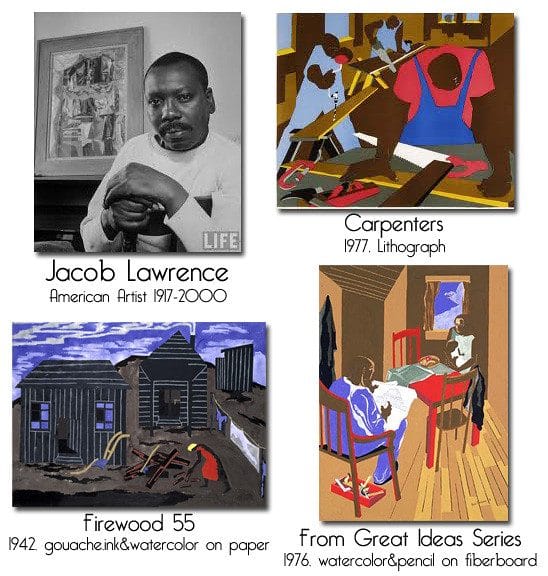
I’ve known for years that I liked the work of Jacob Lawrence.  I’ve had the pleasure of viewing a few works in person, and his vivid color and bold graphic style comprise the type of imagery I strongly identify with, referred to as “dynamic cubism.”  When finding images for this post, however, I was literally blown away by the visual power of his body of work.

This artist, deeply influenced by the colors and shapes of Harlem, is truly an American treasure.  I have moved from “liking” to “loving.”  There are a few artists I will be obsessed with all of my creative life, and Jacob Lawrence has become one of them.

5475324870_aa27f044b3_z-6952297

Lawrence was not only an incredibly talented artist, recognized at sixteen by artist Charles Alston, who taught at the Harlem Art Workshop, but he was a man of remarkable character.  His work isn’t known for depicting debauchery, like many other artists, but rather for bringing national attention to important periods in African-American history.

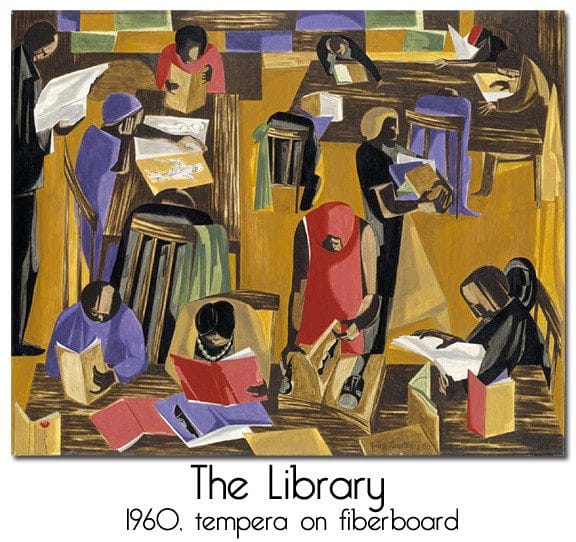
When Lawrence attended school, African-American history was not a subject seriously pursued.  He created “The Library” to depict the crowded rooms in libraries where he would have to actively research information about his heritage.

By the time he was 23, he had already created an impressive body of work, including multiple series of paintings featuring important historical figures like Frederick Douglas and Harriet Tubman.  His sixty-panel set of paintings entitled “The Migration Series,” depicting the migration of hundreds of thousands of African-Americans from the South to the North after World War I, led him to national fame.  The work is powerful and deeply moving.

5475325148_3477c85aec-8621795

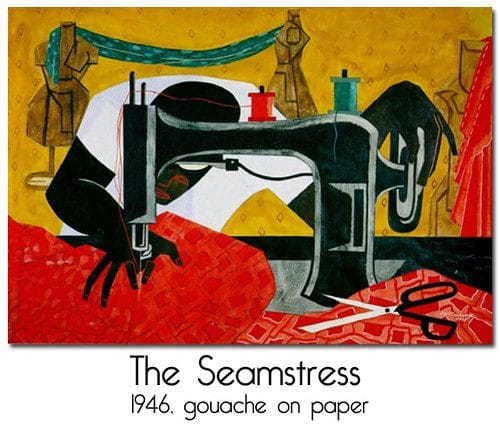
The compositional rhythm and vibrant colors in “The Seamstress” create such a beautiful picture. This is one of my favorite pieces!  You can appreciate Lawrence’s work from a completely aesthetic viewpoint, let alone knowledge of the history behind the images.  That is what makes him an artistic genius!

Having attained national fame for his work, Lawrence still decided to bravely serve his country in October of 1943, when he enlisted in the United States Coast Guard and served with the first racially integrated crew on the USCGC Sea Cloud.  In 1970, the NAACP awarded this admirable artist with thin Spingarn Medal to recognize a life of outstanding achievements as a artist, teacher and humanitarian. The list of other recipients of this medal is astounding!

When Lawrence died in 2000, he was hailed by the New York Times as “One of America’s leading modern figurative painters,” and “among the most impassioned visual chroniclers of the African-American experience.”  He is truly an artist to be admired and greatly respected.

Spread The Love, Share Our Article

  • icon-mini-delicious-4203078
  • icon-mini-digg-3448305
  • icon-mini-stumbleupon-1219365
  • icon-mini-technorati-2207437
  • icon-mini-twitter-5093697
hearttag1copy-9399752

Elysian Studios: Artists at Play: Valentine's Painted Canvas Tags

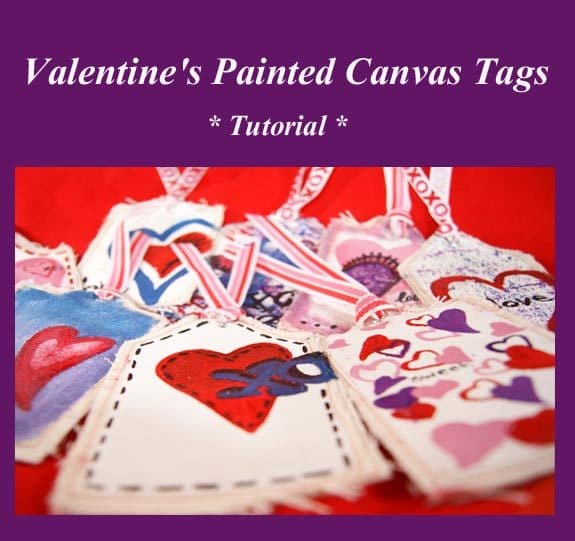
hearttag1copy-9399752 Here’s a simple craft, that has lots of different applications, especially if you are a painter!  If you’re not a painter, just break out some colors and have fun with it!  These are unique gift tags, but would also be fun on cards and in scrapbooks.  For you crafty entrepreneurs, these would make a special addition to your packaging! Like ACEO’s? This technique can be used to create some new editions!  Most importantly, they are a great excuse to get whimsical and doodle with paint!

Materials:

fabric (any sturdy cotton or polyester fabric will do!)

paints (I used oil paint for fun, but acrylic or craft paint is fine!)

brushes

pencil (or disappearing fabric pen)

eyelets (3/16″ in size)

ribbon (narrow enough to fit through eyelet)

thread

sewing machine

scissors

hole punch

Crop-A-Dile (or eyelet setting tool)

card stock tag template

Gesso, or solid acrylic paint of choice for base coat

hearttags2-8631464

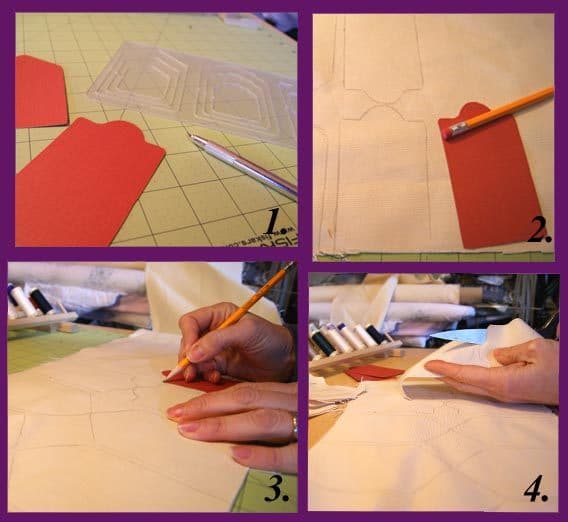
1. Make a card stock tag template.  I created mine using a Coluzzle template, but any simple tag shape will do. Avoid curves and scallops, as those extra details are more complicated to sew.

2. Using your template, trace tags onto your fabric.  I simply used a pencil and then sewed the pencil sides together.  You could use a disappearing fabric pen if you are concerned with visible marks.

3.  For stability, it’s best to make the tags double-sided, so trace two tags for every one you wish to complete.

4. Using sharp scissors, cut out the tags.  Pin two like sides together.  The edges will fray, but this will be limited by the stitching when you sew them together.

hearttags3copy-9539862
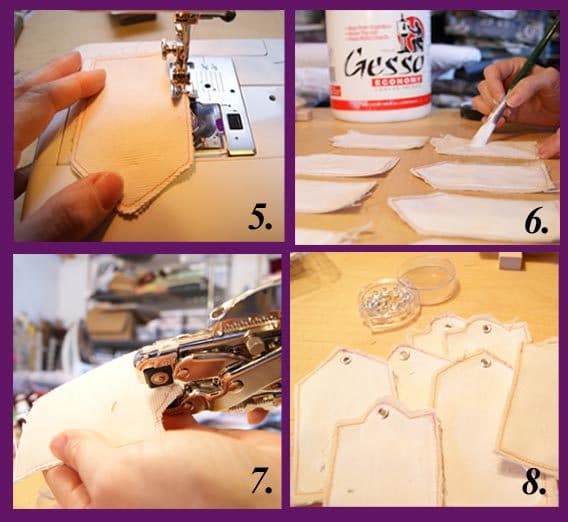
5. Using a simple straight stitch, and the thread color of your choice, sew the two sides of each tag together.  Again, the edges will fray.  Personally, I love this look.  If you prefer clean lines, use Fray Check, or a more complex sewing technique will be necessary. 6. Coat one side of each tag with Gesso, or plain acrylic paint.  I stayed inside the stitch lines, because I like to keep those visible, but go with whatever works for your design.

7. Using the Crop-A-Dile (which is a fabulous tool-I love it!), punch a hole at the top of each tag, and set an eyelet in the hole.  Here’s a video using the Crop-A-Dile, and here’s a more traditional tutorial.

8. Now your tags are ready to paint! I like leaving one side plain, on which you can write or stamp a greeting.  I didn’t show the process of painting, because…. just have fun! Start with hearts, bright stripes or flowers, or just paint a great word in fun colors.

hearttags4copy-2717738

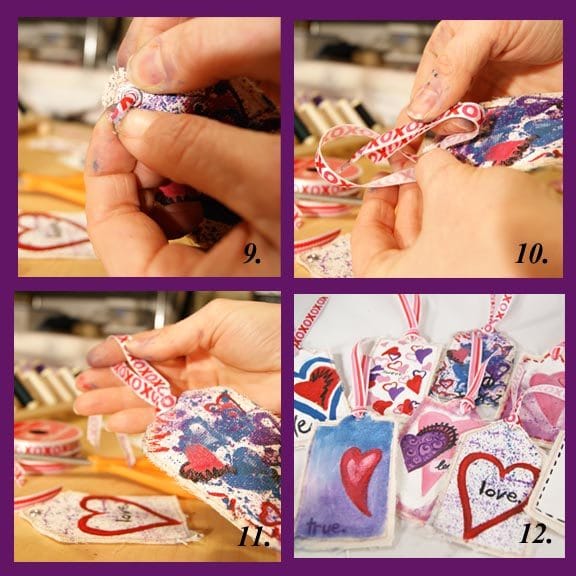
9. Once your tags are painted and dry, snip a good 12 inches or so of your ribbon and embellish your tag.  Fold the length of ribbon in half, and push the two loose ends from the back, through the eyelet, to the front of the tag.

10. There will be a loop on the back side of the tag.  Bring this over the top of the tag and feed the two loose ends of ribbon through the loop.

11. Pull all the way through.  If your ribbon is a snug fit, pull carefully so you don’t pull out the eyelet!

12. My completed set of tags!  This was my first attempt at this project, but I have to say it was fun!

hearttags5copy-3866827

* I attached my tags to bags of homemade cinnamon popcorn (so delicious!) Have you ever tried to make your own popcorn? It’s fun! Here’s the Red-Hot Cinnamon recipe I used to make it more festive!

Enjoy!